Peach + Pluot Tart with Lemon Coconut Cream

IMG_2715


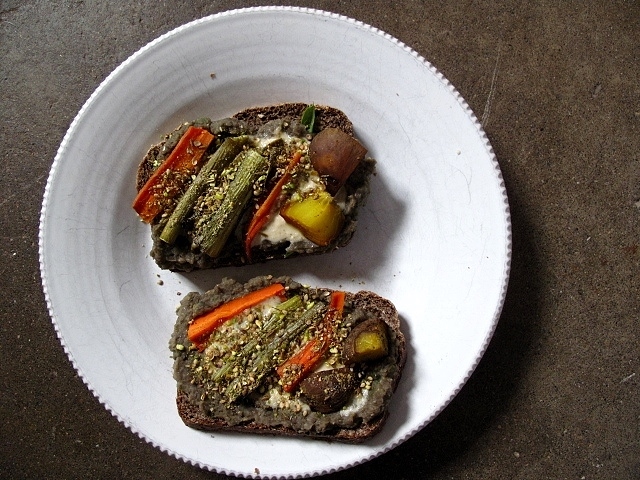
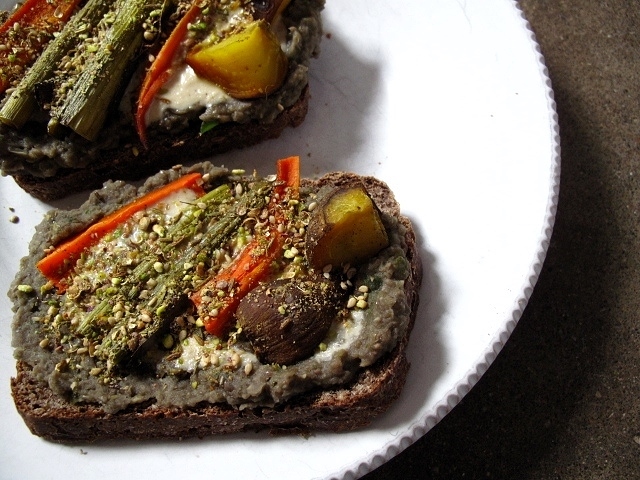
Friday evening and William and I took each other to the county fair. He stood in line for a corndog, a really good one, he said, and then we headed away from all the noise to the barns, ambling through each aisle one by one, comparing the chickens to ours, wondering at whether the tagline saying aggressive! scrawled under the price for a $40 bunny was a comment about the price, the animal’s temperament, or some other reason I already forget. Then we went to the hog barn, the sheep, and then the cattle. I beelined us towards the champion animals, commenting about how when I was in high school a dozen or more years ago, the genetics were just leaning towards better in the sheep division, and now the champion lambs are packed, their muscles rippling with every move.


IMG_2699


After it all we headed a couple blocks over to Friendly’s, a neighborhood natural foods store. We bought small pots of expensive delicious ice cream, brought it back home, and sat in the near-dark on the couch, eating little spoonfuls slowly. When I scraped the last bit from my dish and nearly got up for more, William stopped me, saying no just wait a moment and you’ll realize you’re done. 

And I did.
And I did.

It was a fabulous and simple evening after a long week with more weekend work ahead. It was lovely to just set everything else down for a few hours and be present, enjoying summer, enjoying the magic, realizing the hunger we’re hungry for can be fed in small doses of treats and much larger heaps of time with a loved one and their caring hand and arm around the shoulders, their well-intended suggestions, and in taking the time to share snippets of a long-ago passion at the county fair.


IMG_2691

IMG_2681


The Recipe Redux asked for stone fruit this month. Even though I’ve been eating the various fruits daily, working apricots or plums into morning oatmeal, having a handful of cherries with afternoon snack, or gliding thin slices into whatever savory is up for dinner, this time of year calls for a treat, with stone fruits at their best.

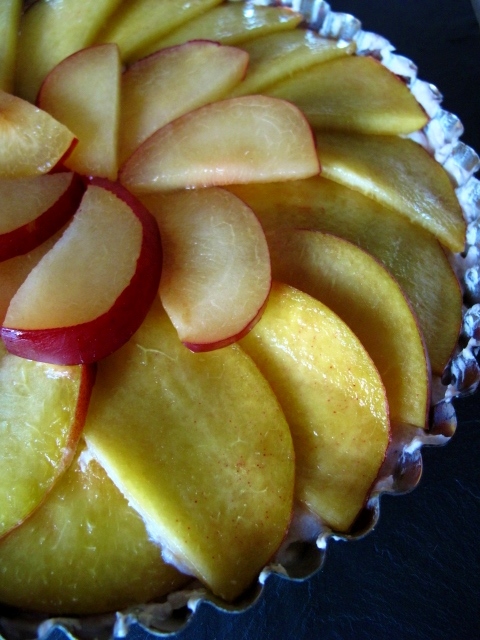
This raw, barely sweet lemon and coconut cream tart is a real favorite, but one I often forget about. It’s one to make for a dinner party or a sunday feast. Or maybe, just because it’s summer and our weary selves need a little wholesome decadent goodness.


IMG_2720


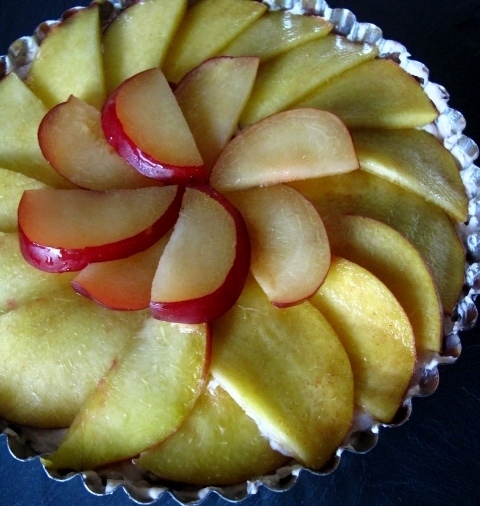
Peach + Pluot Tart with Lemon Coconut Cream, adapted from my blackberry version
There are a few options here. The fruit can of course be changed up depending on preference, but the choice of nuts and sweetener can too. I used a mix of hazel and walnuts, the almond meal, and then used lucuma powder to sweeten. Lucuma is a Peruvian fruit that has a slightly mapley caramel flavor and the powder can be used as a natural sweetener. I had a nearly expired packet in the back of the pantry and put it to good use here, but the alternative of using about half the amount of regular or powdered sugar works well too and honestly isn’t added in enough quantity to do much harm.

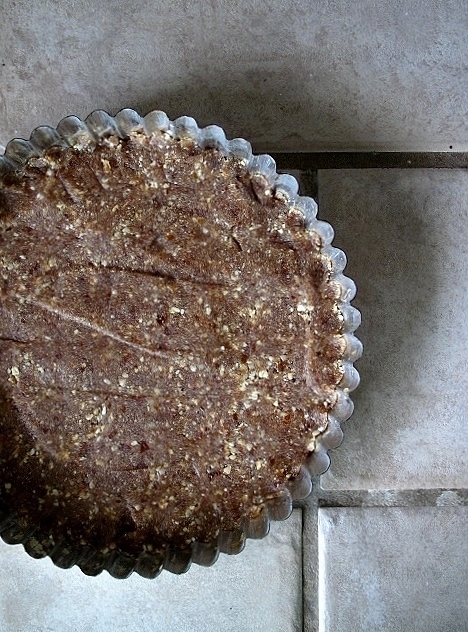
5 medjool dates / 45 g, pitted and briefly soaked
1/2 cup / 50 g nuts of choice, toasted
1/2 cup / 50 g almond meal
1/2 tsp. cinnamon
pinch of salt
1 15 oz. / 400 mL can full-fat coconut milk, chilled
2-4 Tbs. lucuma or sugar
zest from 1/2 a lemon
1 tsp. vanilla extract
1-2 peaches and pluots
lemon juice

  • In a food processor, combine dates, nuts, cinnamon, and salt.  Puree until finely chopped and the mixture sticks together when pinched with your fingers.  Turn out into a 7-8 in tart pan.
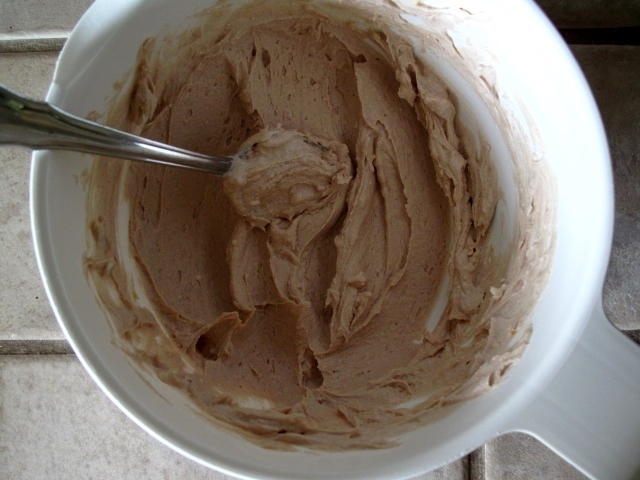
  • Open the chilled coconut milk and without stirring, spoon out the cream layer into a medium bowl. Reserve the watery milk in the bottom of the can for another use.
  • Whip the coconut cream along with the lucuma, lemon zest, and vanilla.  Spoon and smooth atop the nut layer.
  • Thinly slice the peaches and pluots and layer around the top of the coconut filling, in circles, as desired. To preserve the color, brush a little lemon juice across the fruit layer, and then lightly cover and set the tart in the fridge to chill for at least 2 hours.

recipe-redux-linky-logo

Whole Grain Gluten-Free Sourdough Bread

IMG_2671

This summer, myself and a group of fellow nutrition students and alums are reading Deep Nutrition for a book club we’ve started. The theme of the book is about the benefits of traditional diets, somewhat in the Weston Price tradition, for optimal health. I cannot yet comment on what I think of the book as I haven’t read enough to have a strong opinion, but the idea of eating more in the traditional style with its emphasis on whole foods as close to the source and as untouched as possible from chemicals and the like has been a major theme in my nutritional courses over the past two years. It is also a viewpoint I adopted years ago when figuring out how to truly recover from the diet culture I was immersed in and which was contributing to my eating disorder behaviors around foods. In my classes, we’ve also delved a lot into the need for promoting gut health, since a healthy, happily functioning gut can be thought of as the foundation to health in the body and mind far beyond our digestive region. This also happens to be a topic that is near and dear to me because it’s one of my main health struggles.

As I’ve mentioned before, The three major nutritional practices that promote gut health are eating more fiber, eating more fermented foods, and reducing sugar and refined carbohydrate intake.

IMG_2660

Last summer, after a particularly rocky winter and an autoimmune lab marker coming back positive, I began a very focused fine-tuning of my diet and lifestyle, in relation to improving gut health and my reaction to stress, since both strongly contribute to autoimmune conditions. As part of that process, I began a return to making sourdough.

Sourdough, as the name suggests, is a traditional fermentation process where wild yeasts ferment the flours, making them easier to digest because the yeasts create lactic acid, and which then break down anti-nutrients that plants make to protect themselves, such as phytates and lectins. These anti-nutrients block mineral absorption and the resulting sourdough can contain a lot more readily absorbable nutrients than the original unfermented flours or grains. Additionally, the process of fermentation more generally makes all the proteins in the bread easier to digest, and it is the protein that is usually causing an inflammatory reaction for those with GI issues like intestinal permeability, malabsorption, celiac disease, and other autoimmune conditions. Due to our hectic lifestyles and often very non-whole-foods diets, many, many of us have at least some of these symptoms and/or diagnoses that could be improved by adding more fermented foods, in addition to the other two gut health promoting practices of eating more fiber and reducing sugar and refined carbohydrates.

IMG_2648IMG_2651

For someone that is very sensitive to gluten like me, there’s also good news from eating gluten-free sourdough, as there are research indications that the fermentation process involved in making traditionally fermented gluten-free bread reduces the release of inflammatory compounds within the gut for someone who has recently adopted a gluten-free diet due to a celiac diagnosis, whereas consuming other types of gluten-free bread did not reduce these inflammatory responses1.

IMG_2655

Maybe it’s the tea-drinking, sweater-garbed, sourdough-baking wise grandmother in me, but I can’t help but think, of course, to that news. It simply seems that our systems recognize and respond better to the more traditionally made foods like sourdough. Whenever I have a GI flare-up these days, I definitely try to put extra focus on avoiding those refined gluten-free products and even whole grains that weren’t cooked really well, and emphasize sourdough for my grain consumption. I’m finding this helps me return to balance more quickly. For someone that doesn’t react so strongly to gluten, consuming sourdough instead of regularly-baked bread still contributes all the positive benefits I mentioned above about keeping the gut happy and increasing nutrient absorption.

So now, after more than a year of refining my gluten-free sourdough method, I have a recipe I feel good about sharing!

IMG_2673

Whole Grain Gluten Free Sourdough Bread, makes 1 sandwich/toast loaf
– Adapted from Baking MagiqueWholehearted Eats, and with tips from Bad Hunter Stories.
– I have a 100% buckwheat starter that I began using this formula. I did not add any outside culture, but simply created it from the wild yeasts in my home. This meant it took a little longer for the starter to get good and active initially.
– For the buckwheat and oats, I often start with whole grains which I grind in my coffee/spice grinder each time I bake and feed the starter.
– I only make this using a kitchen scale rather than measuring cups, and I’ve found I can interchange the flours, by weight, using this method.
– Using slightly different flours along with the the outside weather will result in needing to change the amount of water. Err on the side of having a fairly moist dough that still comes together. 

80 g brown rice flour
140 g cold buckwheat sourdough starter
110 g water
————–
350 g water at room temperature + more as necessary to reach the desired consistency
20 g psyllium husk
10 g ground flax seeds
————–
60 g of each
– sorghum flour
– oat flour
– buckwheat flour
– millet flour
– teff flour
24 g / 2 Tbs. sugar or honey
1 tsp. sea salt

  • In the evening: Mix brown rice flour, sourdough starter and water in a bowl and cover with a clean kitchen towel. Let sit overnight (about 8-12 hours) in a warm and non-drafty place.
  • In the morning: Mix water, psyllium husk and ground flaxseeds in a bowl and whisk until a thick gel forms. Set aside.
  • In a separate bowl mix all of the dry ingredients.
  • Add the sourdough starter that you made the night before to the wet ingredients and mix.
  • Add the wet mixture to the dry ingredients and stir with a wooden spoon until the flour is fully incorporated. Add a small amount of filtered water, if needed, to arrive at a moist ball of dough.
  • Line a loaf pan with parchment and dump the dough into the pan, smoothing it out into a loaf shape and leveling it into all the corners. Cover with the clean kitchen towel or plastic bag and put in a warm place away from drafts. Allow to rise for 4-6 hours. This will depend on your kitchen warmth. Mine tends to stay cool so I err on the side of 6 to even 6 1/2 hours usually.
  • Preheat the oven to 500°F/260°C. Once the oven’s hot, remove the towel or bag from the loaf, and score the top with one or two good slashes with a sharp knife.
  • Put the loaf in the oven and turn the temperature down to 450°F/230°C. Bake for 70 minutes or until the internal temperature reaches a little over 200°F/90°C.
  • Let the loaf cool on a wire rack for at least an hour, before slicing.

1. Calasso, M., Vincentini, O., Valitutti, F., Felli, C., Gobbetti, M., and Di Cagno, R. (2012). The sourdough fermentation may enhance the recovery from intestinal inflammation of coeliac patients at the early stage of the gluten-free diet. European Journal of Nutrition,51(4). 507-12. doi: 10.1007/s00394-012-0303-y.

pistachio + flower dukkah for midsummer meals

IMG_2570.JPG


I recently taught a class to adults about shopping and cooking simple, healthy meals, and at one point we brainstormed “go-to” meals when time, ingredients, and/or funds might be short. And then we upgraded them. Surprising to me, sandwiches made the list and when I asked for clarification, simple sandwiches like PB&J and grilled cheese qualify as a complete dinner meal for some.

I rarely eat sandwiches for dinner anymore but I definitely did in college. Nowadays, sandwiches, whether true to their type or open-faced, frequently make their way into my lunch options when I’m nearly out of leftovers, or need to re-imagine what’s available and quick to eat. Since The Recipe Redux asked for sandwich upgrades this month, I got to reflecting on the myriad ways I make sandwiches interesting by adding simple, flavorful spreads or sprinkles to take a ho-hum quick meal into something spectacular.


IMG_2572

 
Like my last post which was more a meal-component, today’s idea is to make pistachio and flower dukkah and then keep a jar in the fridge to spoon atop sandwiches, toast, pasta, grain salads, or the like. Dukkah is an Egyptian seed/spice blend that packs a lot of flavor, so doing so can really upgrade a meal. Since it’s summer and I’m all about adding edible flowers to just about everything lately, I also amped up the mix even more with dried lavender and golden calendula flowers (which are soo good for glowing, healthy skin.)

In the interest of helping keep your summer sandwiching interesting, I’ve also got a brief list below of other options to pile between your two favorite slices of bread.


IMG_2588.JPG
a quick lunch with leftovers reimagined: pureed cooked lentils, a drizzle of tahini garlic sauce, roasted vegetables, and pistachio and flower dukkah to top it off.

Spreads:
Muhammara
Spiced Tomato Chutney
All-the-Greens Interchangeable Pesto
Harissa Yogurt
Tahini Garlic Sauce
Beet Hummus
Baba Ghanoush
DIY Whole-Grain Mustard

Specialty Toppings:
Honey-Roasted Rhubarb
Quick-Pickled Onions or Radishes
Apple, Nectarine or Apricot Slices
Roasted Vegetables


IMG_2586


Pistachio + Flower Dukkah
, makes about 1 1/4 cups

1/2 cup pistachios
1/4 cup sesame seeds
1/4 cup coriander seeds
2 Tbs. cumin seeds
1 tsp. fennel seeds
1-2 Tbs. various dried flowers, such as lavender, calendula, rose petals, etc.
several pinches each of dried thyme, marjoram, and oregano
sea salt and freshly ground black pepper

  • In a saute pan, toast the pistachios and seeds until fragrant and lightly colored, about five to eight minutes. Then pour onto a plate to cool. Alternatively, if the pistachios are already lightly roasted, add them in at the end of the this step.
  • Once sufficiently cooled, transfer the nuts and seeds to a food processor. Add the herbs, dried flowers, 1/4 tsp. salt to start, and pulse until the mixture is roughly ground but not yet paste-like. The goal is a fine but still crunchy textured mixture. Taste and add additional salt, if necessary, as well as a few pinches of black pepper.

recipe-redux-linky-logo