A few years ago, I started making various quick gluten-free flatbreads to use in meals when I wanted a grain but needed something quick, easy and different from the usual rice or quinoa or millet or buckwheat. I would often choose a slice or two of my whole grain gluten-free sourdough in that instance, but often I don’t have any bread handy either.
The flatbreads, made with just a couple flours, a pinch of salt and water, were a little lackluster, and William ate them unenthusiastically. Somewhere in the many months of making them, I happened upon the addition of psyllium seed husk. I also use psyllium husk in my sourdough recipe – it’s an essential ingredient for the stretch that gluten-free bread doughs will otherwise lack.
The psyllium addition has been a gamechanger. The flatbreads have become flour tortillas, or wraps, which I went over a decade without, and burrito size tortillas for various burritos and wraps – also a warm welcome after so long without.
The bonus is: these come together really quick! Like just as quick as the much less pliable flour/water/salt version. And if you only want enough for a meal, any leftover dough can easily be refrigerated until the next day, and rolls out super quick as you’re reheating leftovers.
Probably the only thing you’ll be wishing you had is an even larger pan to get these as absolutely large as you can possibly want them. :)
Gluten-Free Flour Tortilla or Chapati Flatbread
This is a quick and easy flatbread that can be used to make thin flour tortillas, or as chapati flatbread as a whole-grain addition to a balanced meal.
12 grams / 2.5 Tbs. psyllium husk (rough husk form, not powder 240 ml / 1 cup warm water 180 grams / 1 ½ cups whole grain gf flour mix (or a 50:50 mix of brown rice and sorghum flour) ¼ tsp. mineral salt
In a bowl, whisk the psyllium husk and warm water. Within a few seconds, a gel will start to form. Set aside until needed.
In a separate larger bowl, stir the flour(s) and salt together, then add the liquids and mix with a wooden spoon until all the flour is mixed in.
Then, give it a thorough knead by hand. Squeeze the dough through your fingers and work your way around the bowl, scraping off the sides as necessary. The final dough should come away from the sides of the bowl and be very springy to the touch. It shouldn’t be too sticky. It doesn’t have to be perfectly smooth – so long as it’s homogeneous with all the ingredients well combined and no clumps of flour or psyllium gel, you can proceed to the next step.
Turn out the dough onto a lightly floured surface. Divide into 4 to 6 equal portions. If making four, this will yield burrito size tortillas or flatbreads – if you’re making them quite thin.
Cover the pieces you are not currently working with with a towel to prevent them drying out.
Use a rolling pin to roll out the dough into a thin tortilla, or if you’re wanting a thicker flatbread, you can also use your hands.
For a tortilla, aim for very thin, about 1mm thick. This works best when your countertop is well-floured and you rotate the dough frequently to prevent it from sticking to the surface. As necessary, dust the top of the tortilla and your rolling pin with more flour.
To cook: Heat a large cast-iron pan over medium-high heat. The pan is ready when a droplet of water sizzles on its surface.
Place a tortilla into the hot pan and cook it for about 45 seconds.
Once you flip it, it should puff up in places with bubbles of varying size appearing. Cook on the other side for about 45 seconds to 1 minute. The tortilla is done when you begin to see large dark brown spots on the underside.
Tip: If your tortillas are cooking/browning too quickly, reduce the heat. If they’re taking longer than a minute per each side to cook, increase the heat.
Transfer to a clean dish towel and cover – this will help it stay soft and flexible. Continue cooking the remaining tortillas.
Notes: The tortillas are best served warm immediately after cooking, but can be stored for 1-2 days and reheated. You can also store the uncooked dough in a covered container in the fridge for a day to quickly make 1-2 fresh tortillas as needed.
I have a weekly ritual of taking a walk around our neighborhood on Mondays, a day that’s typically reserved for no other activity – my rest day from running. The walks serve many purposes because I find it super helpful to do some form of easy, short activity to help me recover better from the previous week’s training load. And the slow walk is a break from work, a time to slow down and notice in more detail the subtle seasonal shifts that are continuously happening all around us. Plus, some of my neighbors tend to put up humorous and light hearted seasonal décor, or I’ll stop and have a little chat with a couple neighbors if they’re out and about. It’s always a win win.
But I also sometimes dread those Monday walks. It’s frequently cold. It’s frequently rainy. It’s frequently windy. And sometimes I love them and the sun shines, like yesterday.
When I can, I enjoy the walks even more when I can convince William to go with me. He often works from home on Mondays and the walk together becomes an especially nice work break.
Yesterday, I was reflecting on how many more flowers have arrived in just a handful of days here locally. The crocuses, the daffodils, the red flowering currant outside our dining room window, and now the first starts of tree blooms. After a long, cold and continuously snowy winter, we all need the bright bursts of coming flowers.
When it comes to eating, this time of year can feel like a chore for many of us too. Your digestion might have slowed down, where everything feels heavy and meals just sit there in your GI. There’s a lot of dampness in the air and that, combined with heavy winter meals can lead to a lot of congestion, mucus, and that heaviness and sluggishness – maybe even an energy crash – after eating. Or maybe you just have no appetite and everything sounds meh.
The first flowers can tell us, it’s time to shift with the season, towards more bitter foods – the brassicas, spring greens, onions and garlic, fresh ginger, black pepper, a pinch of chili flakes to get things moving, and generally more vegetables.
If you’d like inspiration that’s not too green and herbaceous, try out this seasonal pasta. As written, it will need a good quality protein to round out your meal – I’d choose a nice grilled white fish – but you can also make it completely plant-based by adding chickpeas or a chickpea/lentil-based noodle. Chickpeas are also one of the most drying beans – which can make them excellent this time of year for many people. I hope you enjoy – and happy spring!
Creamy Cauliflower and Fennel Fettuccine
Prep: 15 minutes | Cook: 20-30 minutes | Serves:4
2 Tbs. olive oil, divided ¼ cup breadcrumbs (gluten-free as needed) Optional: ¼ tsp. red pepper flakes ¼ cup parsley, minced ½ tsp. mineral salt pinch of black pepper 1 tsp. fennel seeds ½ a large onion, thinly sliced 2 cloves garlic, minced 1 small head cauliflower, chopped 1 bulb fennel, cored and chopped ¼ cup raw cashews, chopped 1 ½ cups water, divided 8 oz. brown rice fettuccine noodles
Heat a skillet over medium high heat. Add 2 tsp. of the olive oil, a pinch of red pepper flakes, and the breadcrumbs. Stir constantly until breadcrumbs are golden.
Transfer the breadcrumb mixture to a bowl and stir in the parsley. Set aside.
Add 2 tsp. of olive oil to the same skillet and heat over medium heat. Add salt, pepper, and fennel seeds and heat until the aroma from the seeds comes up. Then stir in the onion and cook until soft, about 8-10 minutes. Add the garlic and cook for 1 minute.
When the onion and garlic are soft, remove half of the mixture to a bowl and set it aside.
In the skillet, add the cauliflower and 1/2 cup of water to the remaining onion and garlic mixture. Cook, covered, for about 5 minutes, until the cauliflower is soft.
When the cauliflower is cooked, transfer the mixture to a blender. Add the cashews, 1/4 cup water, pinch of red pepper flakes, and the remaining olive oil. Blend until smooth and creamy. Then set aside.
Put the onion and garlic that was set aside back in the skillet, along with the chopped fennel. Over medium heat, sear the fennel for 2-3 minutes on each side. Then add the remaining 3/4 cup of water, stir, cover, and cook until tender and soft, about 20 minutes.
Meanwhile, bring a pot of water to a boil and cook pasta according to package instructions. Drain pasta but reserve about 1/4 cup of pasta water.
Add the pasta back to the pot along with a couple tablespoons of pasta water. Toss to coat, then add in cauliflower puree, along with the braised fennel mixture. Stir to mix.
Divide the pasta into bowls and top with the breadcrumb mixture and a pinch of minced fennel fronds if you have them.
Serve with a healthy protein, such as grilled fish, or swap the brown rice fettuccine for a lentil/chickpea based pasta to make this a balanced meal.
We went from a hot, smoky, and dry October this year to a cold, rainy, (and for a couple hours snowy), November. During a recent day’s of non-stop downpour at 33 degrees, I had one of my last long run’s for my fall training block and returned soaked, frozen, and less enthusiastic about the return of the rain. I normally love the rain.
This last weekend our temperature dropped to 24 degrees. I woke up to a fortunately clear and crisp day to run one of my fastest half marathons (a formal race PR, though around the same time as a solo time trial effort during the pandemic.) Winter and the holiday season is most definitely here.
In northern Washington, where my parent’s now live, that flip of the switch went from summer to a foot+ of snow. We’re taking a long holiday week there this year for Thanksgiving, and are already “enjoying” the beautiful but freezing, powdery snow.
I’ve been asked for holiday recipes of late, and I gave some thought to a simple menu that is nutritionally balanced, easy to digest, tasty, seasonal, and able to prepare without spending hours in the kitchen. At the time I initially prepared this meal, I began cooking after a long work week and for a “quick” evening dinner. That being said, if you’re going to prepare this delicious meal within an hour, there will be some prep and hands-off cooking to do.
As a reminder, I only share recipes on this blog / website semi-seasonally, but do still share recipes in my newsletter. Sign up here to receive more regular recipes and nutrition tips and suggestions.
In whatever way you’re spending the holiday season this year, I hope you are surrounded by those or what you love and reminded of what brings joy to your life.
Savory // recipes below Wild Rice Stuffing with Rosemary, Hazelnuts + Astragalus Long-Cooked Creamy White Beans with Rosemary + Thyme Sage-Roasted Buttercup or Butternut Winter Squash Holiday Braised Cabbage
Further Menu Suggestions: If you’d like some other ideas, check out previous holiday recipe and menu’s I’ve shared over the years or check out the Recipe Index in general for even more suggestions! 2021 2020 2019
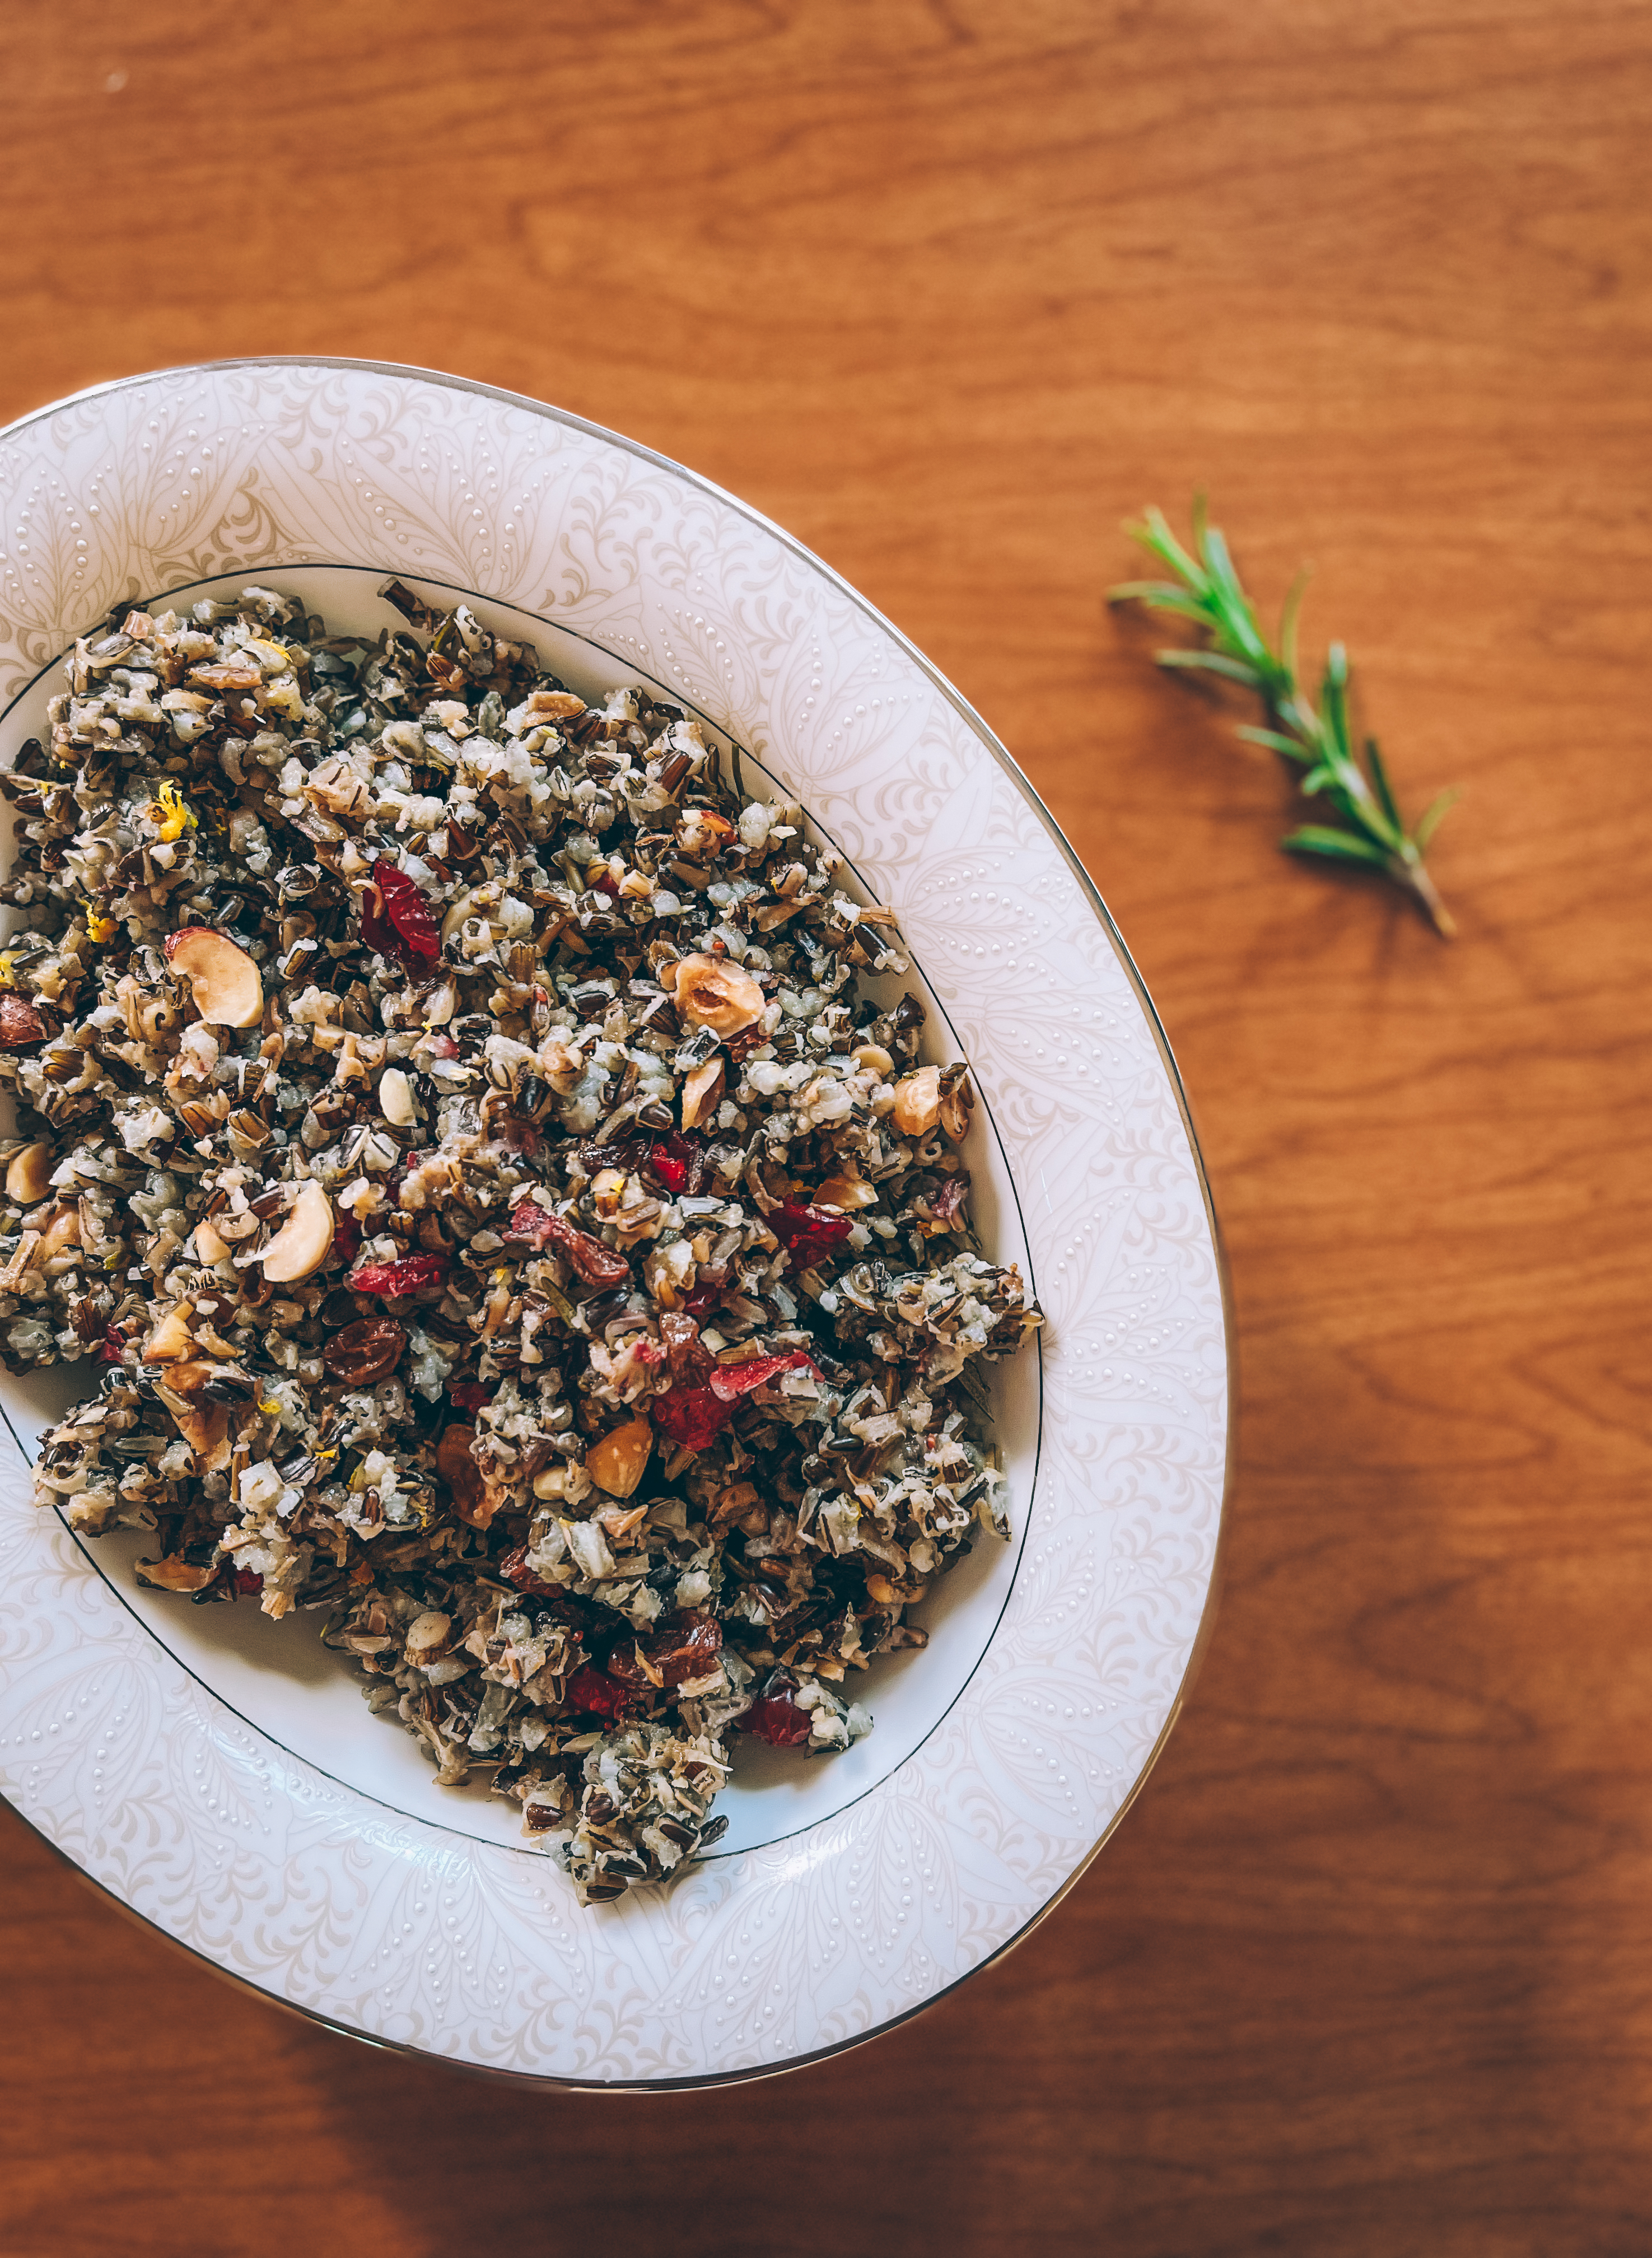
Wild Rice Stuffing with Rosemary, Hazelnuts, and Astragalus
Astragalus is an excellent qi tonic in Traditional Chinese Medicine. It is warming, drying, and slightly sweet in an earthy, rooty way. Medicinally, it can be useful for conditions which are cold in nature, when your energy is depleted, and if you are suffering from chronic fatigue. Used over time, it can strengthen and enhance immunity. As an ingredient addition, the amount used here is not medicinal, or at least it’s not medicinal if used as an ingredient only randomly. If you do not have access to it, it’s okay to leave it out. See the notes below for where to source.
Prep: 4-8 hours | Cook: 1 hour | Serves:4
Wild Rice: 1 cup wild rice, ideally soaked in water for 4-8 hours ⅛ tsp. mineral salt ½ Tbs. astragalus root pieces or 2 slices astragalus root (see Notes) 2 sprigs fresh rosemary, destemmed and minced 2 ½ – 3 cups water
Drain the soaked wild rice in a fine-mesh strainer and rinse it briefly.
Then in a medium pot, add the salt, astragalus pieces, and fresh minced rosemary, along with the water and rice. Bring to a boil, then turn down to a simmer, cover and cook for 45-50 minutes. When it’s done, take off the heat, fluff slightly and leave the top off a little to allow it to cool slightly.
In a serving dish or platter, gently mix together the wild rice, raisins and cranberries, chopped hazelnuts, and balsamic vinegar. With a micro-grater, grate a small amount of fresh orange peel over the top, and then gently mix that in too. You don’t want to overdo the orange – just add an additional lively seasonal topnote to round out the dish.
Serve warm or at room temperature. While this “stuffing” is not used to stuff anything, you can also make it just as written and then use it as actual stuffing if you are making a holiday roast (turkey, etc.) or to stuff and bake a pumpkin, squash or other large vegetable.
Notes: Astragalus root can be purchased in many well-stocked herb or natural food stores in the bulk section, or online from trusted retailers. Mountain Rose Herbs is an excellent source.
Sage-Roasted Buttercup or Butternut Squash
A simple and delicious side dish that can be added to any number of fall and winter meals, whether it’s for a feast day meal, or for a simple weeknight.
Prep: 15 minutes | Cook: 30 minutes | Serves:4-6
1 medium (~1 – 1 ½ lb.) buttercup or butternut squash ¼ tsp. mineral salt Pinch of black pepper 6-8 fresh sage leaves, minced 2-3 tsp. olive oil water to cover
Preheat your oven to 425 degrees F, and prep a large baking pan by lining it with parchment paper.
Split the squash in half, then take out the seeds. Slice the two halves into medium-long slices, and lay them on the baking pan in a single layer.
Sprinkle over the minced sage, salt, and black pepper. With your hands or a mixing spoon, stir the squash so the seasonings are dispersed. Then add a little water to the bottom of the pan so it comes up to about ¼ – ⅓ of the way up the sides of the squash pieces.
Roast in the oven for 25-35 minutes, or until the squash is totally soft when pierced with a fork. The water should all be absorbed and baked off.
When the squash comes out of the oven, drizzle over a little olive oil and transfer to a serving platter, or atop the wild rice stuffing.
Notes: – Buttercup (shown in the photos) is a different, smaller variety of winter squash than butternut. It is lovely – if you find it at your local market, try it out. The flesh is a little more yellow and slightly less dense than butternut squash. – Wait to add olive oil until the vegetables have been removed from the oven and are cooked. High quality olive oil is extremely rich in antioxidants and phytochemicals – but they are sensitive to high heat and will turn toxic and inflammatory to the body when oxidized. Think of extra virgin olive oil as an olive smoothie. You wouldn’t roast your green smoothie, would you?
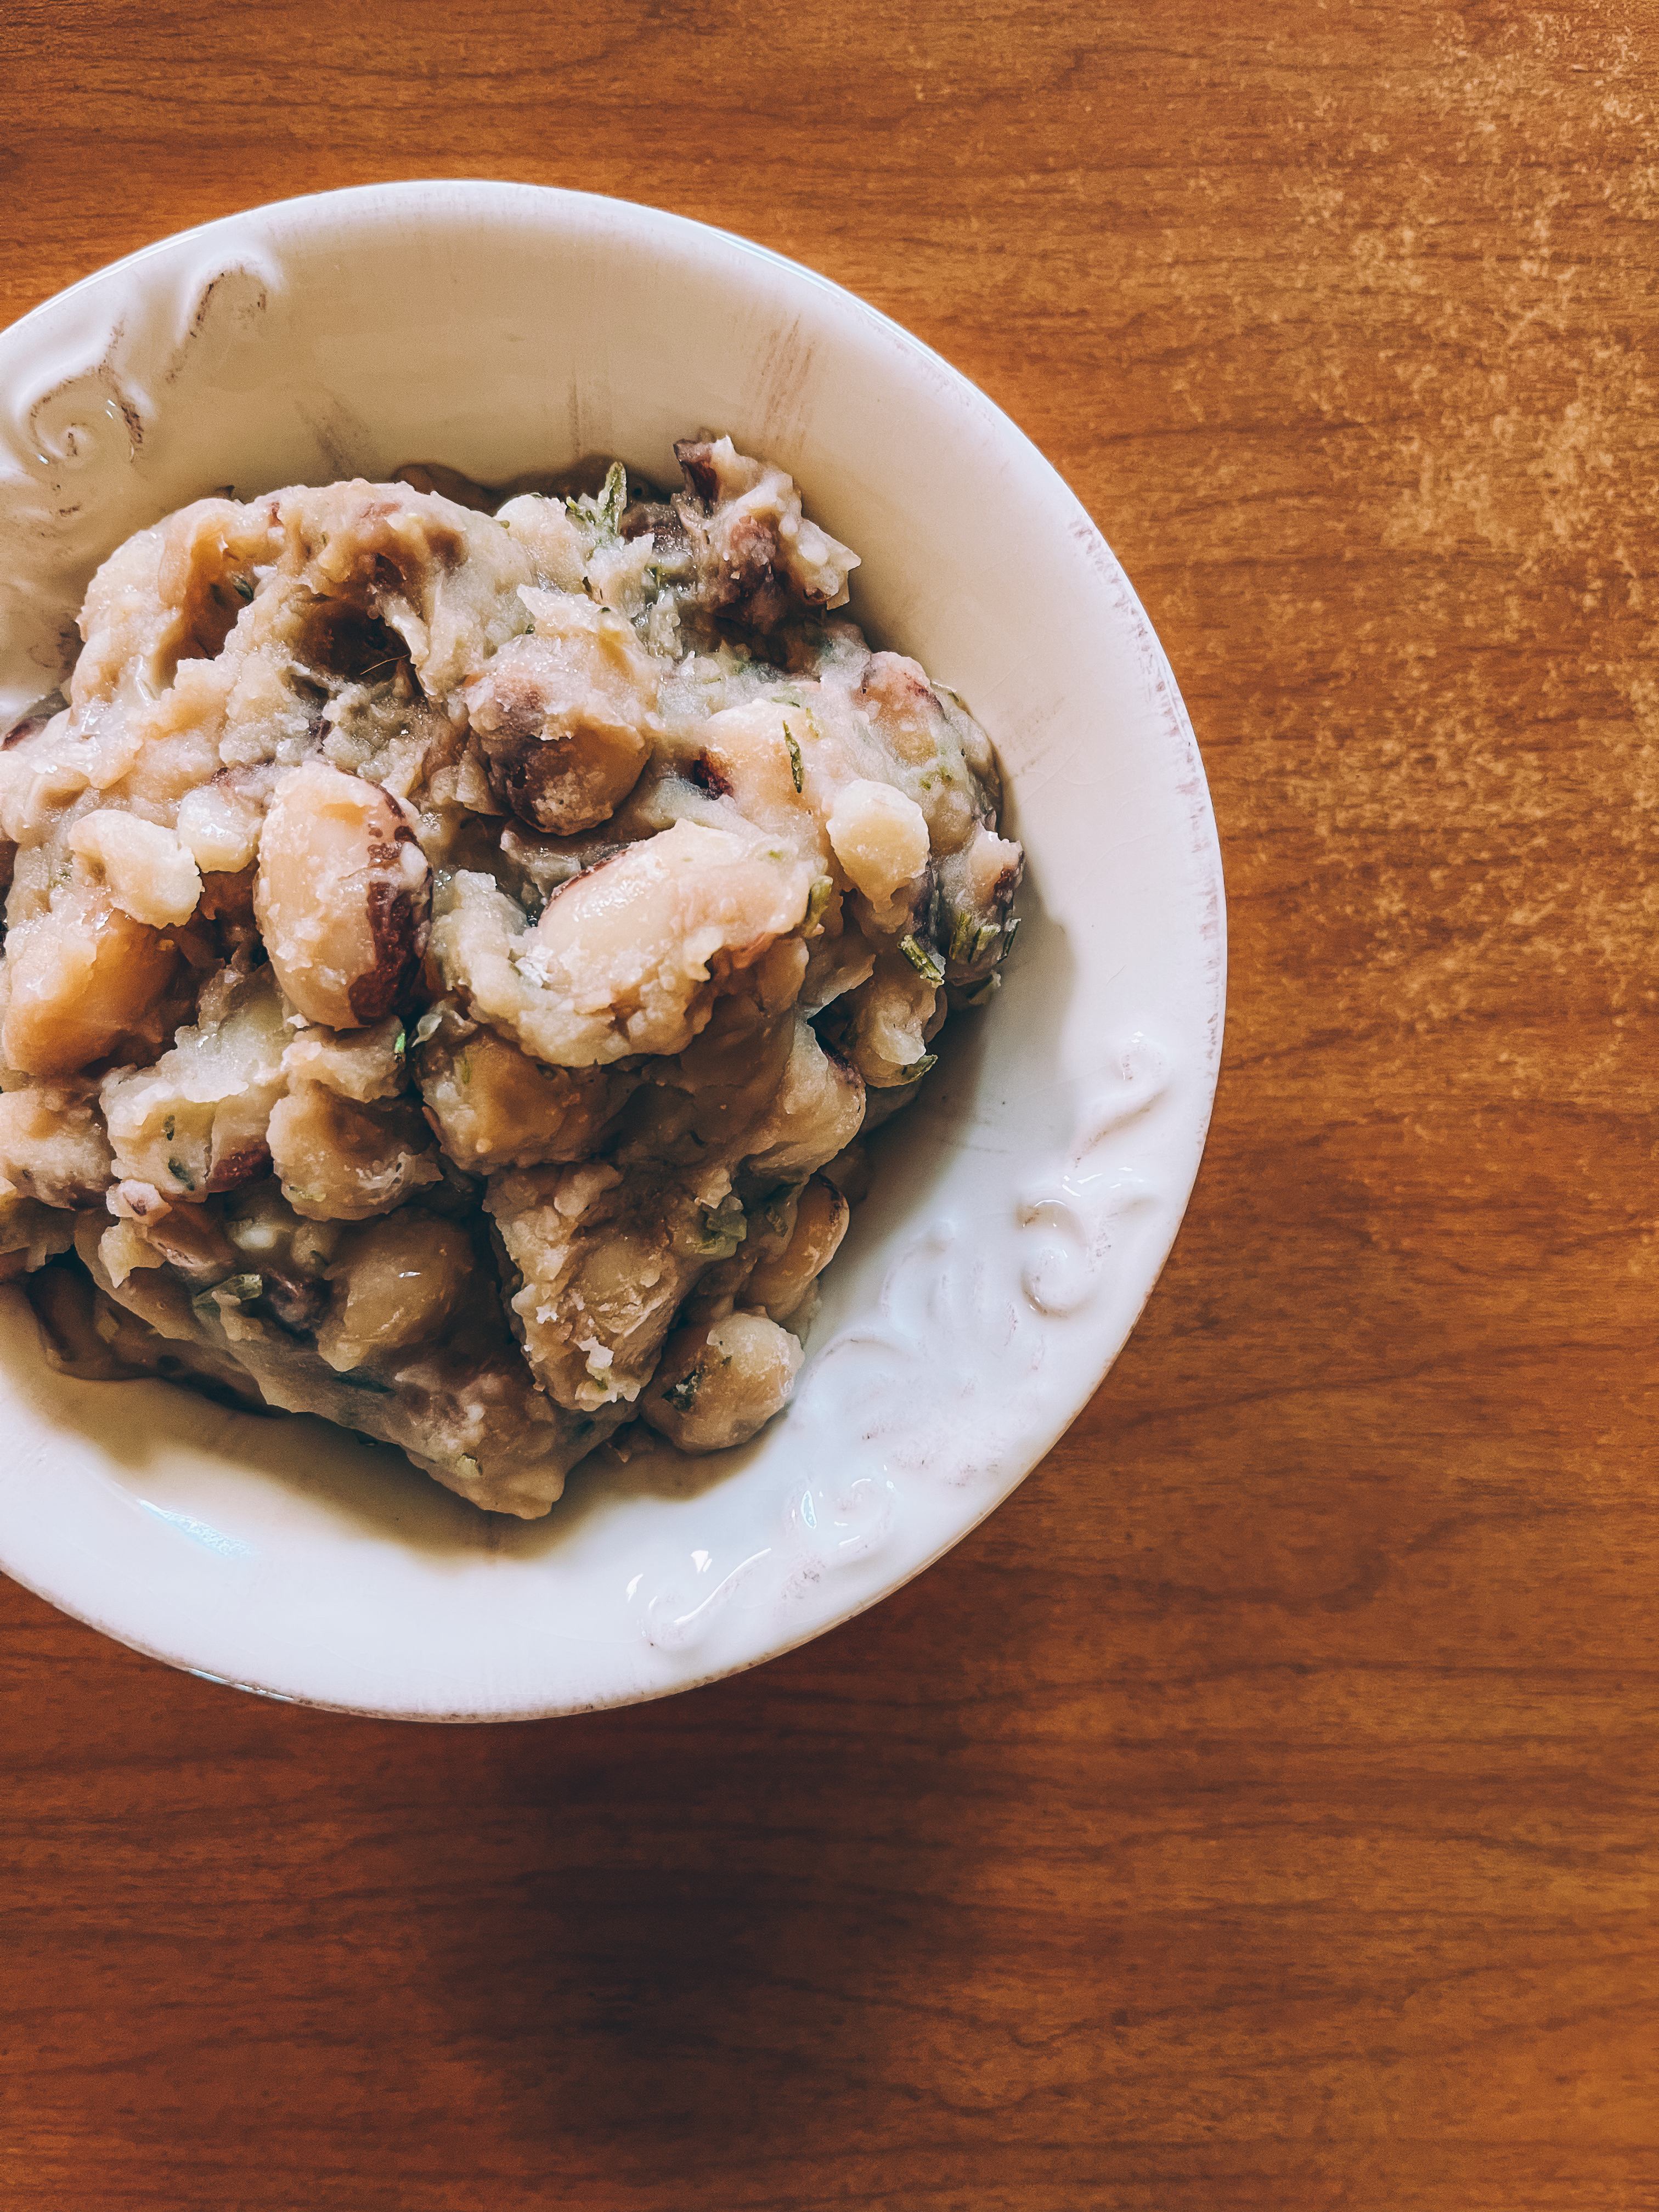
Creamy White Beans with Rosemary + Thyme
It is very common for many people to not tolerate beans and lentils – either any/all beans and lentils or the types that are larger, thicker-skinned, and more difficult to digest. This is often the case when digestion is compromised. Instead of eliminating these nutrient-packed foods from the diet and decreasing diversity, many people will find they can actually tolerate them when cooked with spices/seasonings that aid in digestion. Adding herbs and spices is beneficial for digestion of most meals. In most cultures, the foundational reason that spices are added is for digestion and absorption first, and for taste as a secondary bonus. These white beans are cooked until creamy and soft; their texture is lovely, flavor delicious, and they are easier to digest too!
Prep: 8+ hours | Cook: 2 hours | Serves:4-5
1 cup dry cannellini, flageolet or similar white beans, soaked for at least 8 hours ½ tsp. mineral salt 2-3 sprigs of fresh thyme or about 1 tsp. dried thyme 1-2 sprigs of fresh rosemary leaves, finely minced Pinch of fenugreek seeds water to cover
Add the soaked and drained beans to a medium saucepan along with the salt, herbs, fenugreek, and enough water to cover by a couple inches. Bring to a medium-high heat and bring to a boil. Then turn down to a medium-simmer and partially cover. Cook for about 2 hours, until the beans are soft and beginning to break apart easily on their own, or when lightly pressed.
Cabbage cooked simply has a subtle natural sweetness that comes through. It rarely looks show-stopping, but as a bitter / extractive vegetable, it’s quite the quiet powerhouse. Use any type of cabbage here, from bright red/purple, crinkly savoy, or your standard green variety.
Prep: 5 minutes | Cook: 20-30 minutes | Serves:4
1-2 tsp. olive oil ¼ tsp. mineral salt ½ tsp. fennel seeds ¼ tsp. black cumin / kalonji / nigella seeds (see note) 1 medium cabbage, thinly sliced 1/2 cup water
Heat the oil in a large skillet over medium heat. Then add the salt, and seeds and warm until they start to develop an aroma.
Turn up the heat slightly and stir in the sliced cabbage, along with the water. When the water begins to simmer, lower the heat, cover the pan, and simmer over low heat for about 20-30 minutes, or until the cabbage is very tender. Check and stir the cabbage a few times while cooking and add a little more water if it begins to dry out or starts to stick. When it’s done cooking, you don’t want any water left in the bottom of the pan, but you don’t want it to be dry either.
Enjoy as a simple, tasty side dish.
Notes: Black cumin (also called black seed) is warming and an excellent addition for digestion. If you cannot locate it, add a pinch of brown mustard seeds instead.