Strawberry Rhubarb Scones {gluten + dairy-free} and Celiac Awareness Month

I was listening to an interview a few days ago with a nutritionist who was immediately asked, “So you’re a nutritionist. What diet are you on?”

Before she responded, I visibly cringed because let’s face it, most of us who work within the nutrition world follow a style of eating that is a type of diet. The reason for this varies but is usually because many of us that spend our days helping others with food and health came to it because we struggled ourselves.

And that’s true of myself as well.

The individual on the podcast quickly and proudly clarified that she has no food restrictions and isn’t on a diet. Had I been a nutritionist more than a decade ago when I first began to realize I was being called and pulled in this direction, I would have said the same. At that point, is was very helpful for me to eat the full spectrum of foods and to not have any restrictions, as is true for many individuals.

But then a lot more health challenges came along and here I am, a veteran of a gluten-free (and dairy-free, mostly vegetarian) diet. My journey was and continues to be one of a food as medicine approach. But I’m certainly not the type of person that believes everyone needs to prescribe to my way of eating. We’re all so different with life circumstances, genetics, preferences, and yes, food choices or dietary restrictions as a way to remain in balance with our health.

Celiac Disease Awareness

May happens to be Celiac Awareness Month, and as an individual that has had to eat strictly gluten-free for the last eight years, the better part of those years has been in educating others about what it means to live with a food restriction that when contaminated with even a little gluten, leaves longer-term symptoms than ‘just’ having a stomachache for a day or so.

What that means is also different for each person. 80 percent of individuals with celiac disease have difficulty remaining gluten-free, 70 percent are still exposed to gluten while on a strict gluten-free diet, half of all children with celiac are anxious about eating, many individuals have symptoms of depression, and nearly all have sacrificed major life experiences such as not being able to travel widely, enjoy a meal out with friends, enjoy the full experience of a wedding or birthday celebration and the like.

For me, it means I rarely eat out because I react to most restaurant meals unless it’s made in a strict gluten-free kitchen. Pizza, bakeries, gastropubs, and the like that serve a traditionally floury mix of foods and/or have one grill, fryer, or oven are generally the worst — ethnic cuisines that tend to be gluten-free by their nature are less risky. This is similar when eating in the homes of friends or family. (Wheat) flour in the kitchen tends to mean it floats and ends up in foods and surfaces you wouldn’t think about unless you have to.

On the flip side, there are many options to live fairly comfortably with a gluten-free lifestyle these days. More restaurants are beginning to understand the major issue of cross-contamination. Usually these restaurants have a family history and they’re the ones to trust because they take it seriously.

And gluten-free flours and baked goods are much more plentiful in the last several years.

But that doesn’t always mean we should be eating them.

What do you mean? I have to eat gluten-free because of celiac or similar and you want to take away my GF baked goods too?

Inherently, most gluten-free baked products have a lot of “junk” ingredients in them, ie starches, gums, and excess sugar (hello boxed gluten-free cake mix whose main ingredient is sugar). What most of these ingredients turn into in the body is a simple sugar, and sugar is extremely inflammatory, especially for individuals with an autoimmune disorder–which means the body tends to be really good at making inflammation a regular event. Not so good for daily comfort, being pain-free, having a positive mood, or long-term health.

So while I’m not a proponent of too many gluten-free baked goods — especially if they’re made with lots of refined flours, starches, gums, and sugars, I tend to be of the mindset that fresh baked bread, cake, cookies, and pastries and even the kind that are actually just not that good for you, can make their way into a Celiac friendly diet. Though maybe as just sometimes foods rather than everyday.

Depending on your personal health needs, of course. See last week — Are You Eating Enough for Your Activity Level? — as an example.

And while this is a celiac disease and gluten-focused article, I’m fully aware that other restrictive diets due to food allergies and/or medical necessity can be just as or more challenging to navigate. Despite this, my goal as a food as medicine eater and nutritionist is always to increase the diversity of our daily food choices, rather than limit them.

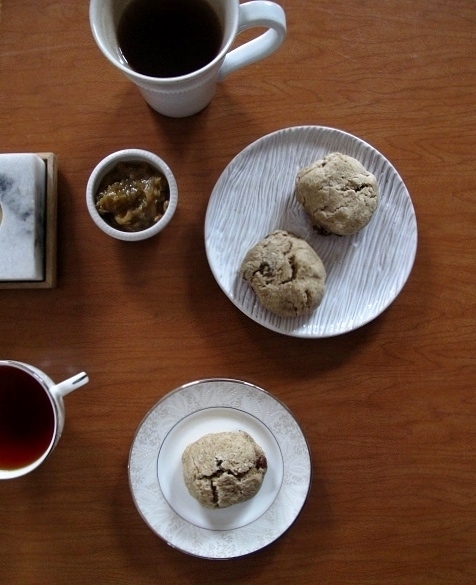
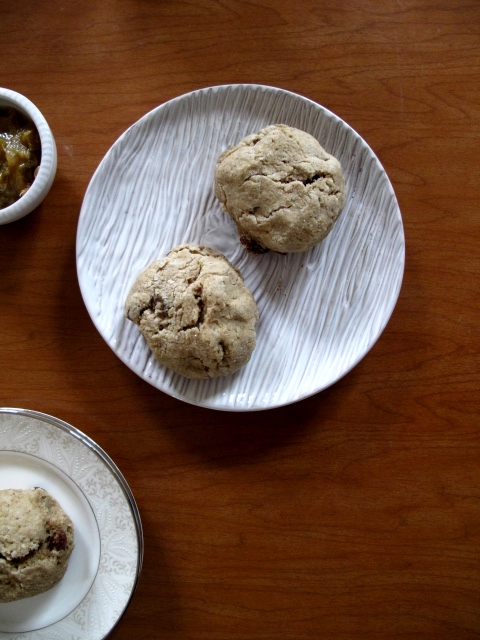
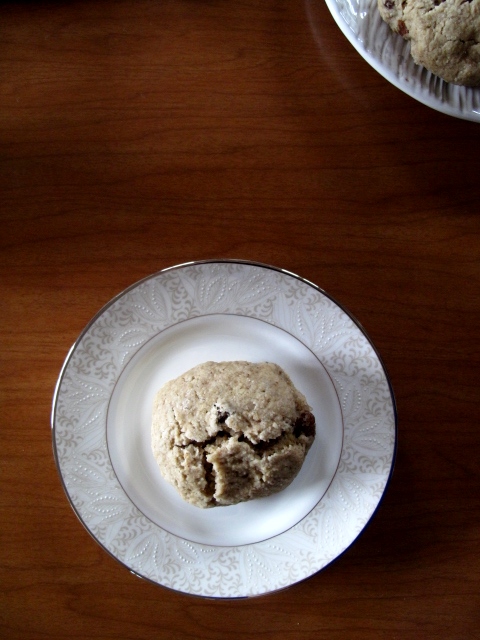
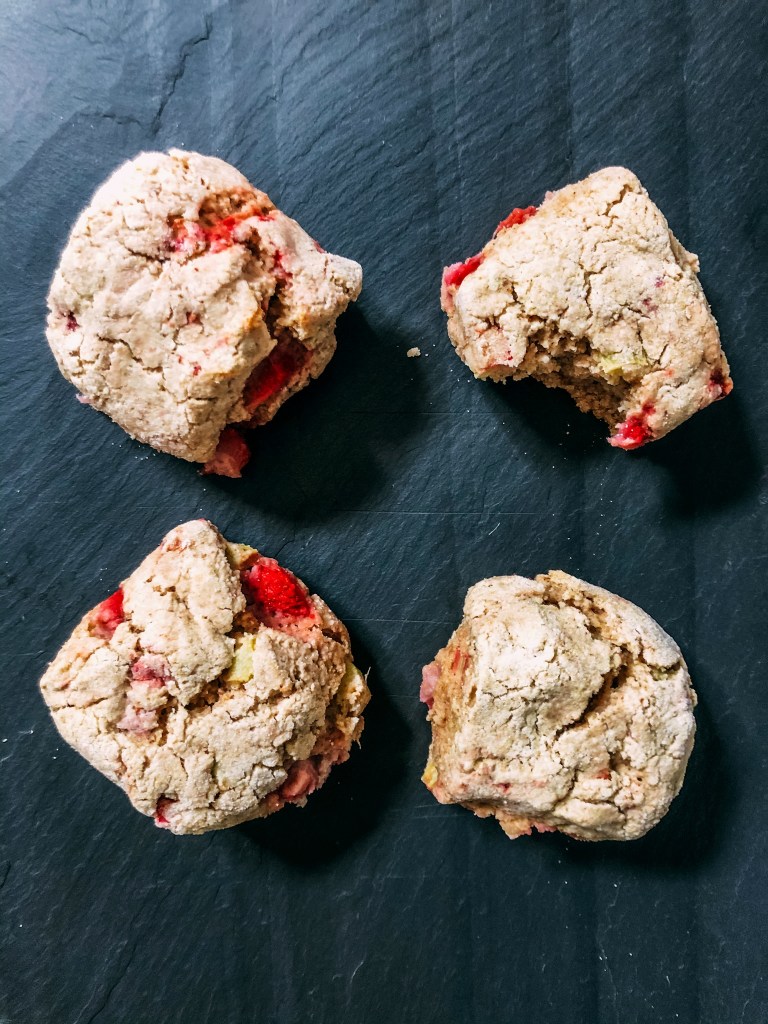
Strawberry Rhubarb Scones, makes 8
These are the Irish style of scones, so they’re usually made round, low in sugar or without, and delicious sliced in half and eaten with a little cream (traditional), yogurt, or honey.

I’ve made these with vegan butter here (Melt Plant Based Butter Sticks), but unrefined extra virgin coconut oil and Kerrygold butter also work well . Freeze your butter or oil and then grate it into the flour mixture. If you have no reason for avoiding true dairy butter, opt for that instead and choose a good brand, like Kerrygold. 
The addition of sugar and vanilla are optional because I left them out in my first try of this recipe and found them still delicious. You’ll know by now I tend to be acclimated to eating very little sugar so keep that in mind.

160 g oatmeal
110 g buckwheat groats
10 g arrowroot starch or cornstarch
25 g sugar (optional)
4 teaspoons / 20 g baking powder
½ teaspoon salt
60 g / 4 Tbs. frozen grated butter or coconut oil
¾ cup chopped strawberries
1/3 cup finely chopped rhubarb
2/3 cup cold non-dairy milk
1 tsp. vanilla (optional)

  • Preheat oven to a very hot 475°F
  • In a spice grinder or food processor, mill the oatmeal and buckwheat until they’re ground into a fine flour.
  • Combine all the dry ingredients in a mixing bowl.
  • Rub the frozen grated butter or oil into the dry ingredients until it resembles very coarse bread crumbs with some pea-sized pieces.
  • Stir in the chopped strawberries and rhubarb.
  • Add the milk and vanilla at once and stir until it just forms a sticky dough. They will seem a touch wet, but they will end up more tender this way!
  • Turn the dough out onto a lightly floured board and lightly flour the top of the dough. To achieve a layered effect in your scones, knead very gently once (do not press too firmly) then fold and turn the kneaded dough about 3 or 4 times until the dough has formed a smooth texture. Scones require a light hand so be gentle and err on working the dough less.
  • Pat or roll out the dough into a 12 inch by 8 inch rectangle or circle that’s a little more than 1-inch thick. Cut or separate it into eight equal portions and gently form into rounds.
  • Place the rounds just touching on a baking dish and bake in the preheated oven for about 12 minutes (check at 10 minutes so as to not overbake!) until the scones are well risen and are lightly colored on the tops.
  • Immediately place the pan onto a cooling rack and serve while still warm, or gently reheated.

Other Seasonal Strawberry Recipes:
Strawberry Tabbouleh
Strawberry, Asparagus + Radish Flatbread
Strawberry Cardamom Lassi
Berry Bran Muffins
Strawberry Rhubarb Pie

Simple Fruit Scones

IMG_3245

I guess you can say I’m on a bent with the idea of ‘simple’ meals lately. These scones are what I’ve been eating recently, usually alongside a big pan of sautéed greens and turnips or beets, with a couple eggs scrambled in. It’s like a savory ‘fancy’ breakfast for dinner several nights in a row, and only takes a few minutes, no planning ahead, and whatever vegetables are already on hand.

For these scones, I revisited this recipe, adjusted the types of flour by switching to whole buckwheat groats and oatmeal, which I weighed and then ground in my coffee/spice grinder. And then I added in a small handful of dried fruit, a mixture of chopped dried apricots and cranberries in the first round and simple raisins in the second–since I live with a William of very simple tastes. Both are delicious, and it’s fair to say that these are my favorite of all the British or Irish style scones so common alongside breakfast or served with a vegetable soup.

IMG_3242

Interestingly, in my original recipe I wrote that I’d post a whole grain version of the scones. It only took seven years, but I’ve finally done it!

IMG_3235

The impetus for these are from The Recipe Redux February theme of Oscar Movie Inspiration. Since the Academy Awards are on February 24th, we were asked to head to the movies – and into the kitchen to show our favorite movie-themed recipe. My all-time favorite movie – and one of my favorite books – is Pride and Prejudice. I watch it often, usually when I need a little emotional lift and basically have the entire thing memorized. Aside from that, I tend to gravitate toward British-historical movies in general and the Harry Potter series. With all that British influence, tea and scones are a nice quick mini-meal. Eat them for mid-afternoon tea, an on-the-go breakfast, or like I did, as part of a simple breakfast as dinner.

IMG_8945


Simple Fruit Scones
, makes 4
I’ve made these with vegan butter (Earth Balance sticks), unrefined extra virgin coconut oil, and Kerrygold butter. They all work well as long as you freeze your butter or oil and then grate it into the flour mixture, though I’m partial to the vegan butter since it gives a slightly more ‘buttery’ taste than does the coconut oil. If you have no reason for avoiding true dairy butter, opt for that instead and choose a good brand, like Kerrygold. 

80 g oatmeal
55 g buckwheat groats
5 g arrowroot starch or cornstarch
2 teaspoons / 10 g baking powder
¼ teaspoon salt
25 g / 1/4 cup dried fruit of choice
30 g / 2 Tbs. frozen grated vegan butter or coconut oil
120 ml / 1/2 cup cold non-dairy milk

  • Preheat oven to very hot 475°F
  • Grind the oats and buckwheat into a fine flour/meal in a coffee or spice grinder. Then add with the remaining dry ingredients into a large bowl.
  • Rub the frozen grated butter or oil into the dry ingredients until it resembles very coarse bread crumbs with some pea-sized pieces.
  • Add the liquid at once into the mixture and stir until it just forms a sticky dough. They will seem a touch wet, but they will end up more tender this way!
  • Turn the dough out onto a lightly floured board and lightly flour the top of the dough. To achieve a layered effect in your scones knead very gently once (do not press too firmly) then fold and turn the kneaded dough about 3 or 4 times until the dough has formed a smooth texture.
  • Pat or roll out the dough into a 6 inch by 4 inch rectangle or circle that’s a little more than 1 inch thick. Cut or separate it into four equal portions and gently form into rounds.
  • Place the rounds just touching on a baking dish and bake in the preheated very hot oven for about 12 minutes (check at 10 minutes so as to not overbake!) until the scones are well risen and are lightly colored on the tops.
  • Immediately place the pan onto a cooling rack and serve while still warm, or gently reheated.

recipe-redux-linky-logo

Mastering the Humble Scone

It’s time again to share another successful Daring Bakers challenge!  This time around Audax Artifex was our January 2012 Daring Bakers’ host.  Aud worked tirelessly to master light and fluffy scones (a/k/a biscuits) to help us create delicious and perfect batches in our own kitchens!

That’s right.  Scones in the rest of the world (as in not the U.S.) are the same thing as our biscuits.   Who would have known? (unless you’ve traveled to England, Ireland, or Australia of course.)  Well, let’s just say that during my time over in Europe, scones made a showing for quick breakfasts to-go while we were catching the morning bus to far-off places.  Usually I’d take the wholemeal versions and W would opt for the creamy white fluffs, like these.

Back in America, I’d mastered the perfect biscuit recipe yielding light and fluffy (and somewhat healthy) results.  But then gluten happened.  Or, shall I say, a reaction to gluten happened, and here I am with a challenge on hand that was more than enough challenge for the first month of the year and baking gluten-free!

I tried several recipes for scones–none of which began as gluten-free because I believe that everyone should have access to this recipe, not just those with special diets.  I did end up deciding that all of Audax’s wonderful work proved correct and she had developed (or discovered) the best basic recipe for the English scone or American biscuit that could be easily adaptable for me.  So I only tweaked my flours a bit, but left the remaining recipe the same for you to try.

Yep, I had a snack mid-shoot!

In the future, I will be creating a wholegrain version of these to satisfy my desire for texture and heft, but for now these do perfectly with a bit of rhubarb jam and a good strong cuppa.  And they will become my go-to for all those friends and fam that don’t share my desire for wholegrain!

And it was quite delicious.

Basic Scones (a.k.a. Basic Biscuits)

Serves about four.  Recipe can be doubled.

Ingredients:

1 cup (140 gm) all-purpose flour or 140 grams all-purpose gluten-free mix plus 3/4 tsp. xanthan gum

2 teaspoons (10 gm) fresh baking powder

¼ teaspoon (1½ gm) salt

2 tablespoons (30 gm) frozen grated butter

approximately ½ cup (120 ml) cold milk

Directions:

1. Preheat oven to very hot 475°F

2. Triple sift the dry ingredients into a large bowl. (If your room temperature is very hot refrigerate the sifted ingredients until cold.)

3. Rub the frozen grated butter into the dry ingredients until it resembles very coarse bread crumbs with some pea-sized pieces if you want flaky scones or until it resembles coarse beach sand if you want tender scones.

4. Add nearly all of the liquid at once into the rubbed-in flour/fat mixture and mix until it just forms a sticky dough (add the remaining liquid if needed). The wetter the dough the lighter the scones (biscuits) will be!

5. Turn the dough out onto a lightly floured board, lightly flour the top of the dough. To achieve an even homogeneous crumb to your scones knead very gently about 4 or 5 times (do not press too firmly) the dough until it is smooth. To achieve a layered effect in your scones knead very gently once (do not press too firmly) then fold and turn the kneaded dough about 3 or 4 times until the dough has formed a smooth texture. (Use a floured plastic scraper to help you knead and/or fold and turn the dough if you wish.)

6. Pat or roll out the dough into a 6 inch by 4 inch rectangle by about ¾ inch thick. Separate into four equal portions and gently form into rounds.

7. Place the rounds just touching on a baking dish if you wish to have soft-sided scones or place the rounds spaced widely apart on the baking dish if you wish to have crisp-sided scones. Lightly flour the tops.

8. Bake in the preheated very hot oven for about 10 minutes (check at 8 minutes since home ovens at these high temperatures are very unreliable) until the scones are well risen and are lightly coloured on the tops. The scones are ready when the sides are set.

9. Immediately place onto cooling rack to stop the cooking process, serve while still warm.