Sourdough Pizza! {gluten + dairy-free}

img_8102.jpg

Every summer I have a meal that’s on repeat, usually as a way to use what’s coming in fast from the garden or otherwise to appease my cravings. Last summer that was kitchari and a green soup/sourdough pairing, the summer before that was zucchini noodles and pesto, and this summer it is this sourdough pizza with roasted vegetables. I’ve been making this pizza on the weekly for months and am not about to grow tired of it.

IMG_2756.JPGIMG_2759

If you’ve ever tried gluten-free pizza out on the town, you’ll likely know the experience is regularly disappointing and the ingredient list is fairly terrible. I’ve almost entirely given it up, especially too since there are very few establishments where cross-contamination is not a huge issue. (I once worked in a bakery. When working with flours, gluten is everywhere.) What I like about this recipe is that it’s super easy, takes only minimal planning ahead, is truly bready and delicious, allows me to feed my sourdough starter regularly without making way more bread than I can eat or throwing it out, and the sourdough fermentation allows for better mineral and vitamin absorption from the flours, leading to overall happier digestion and long-term health.

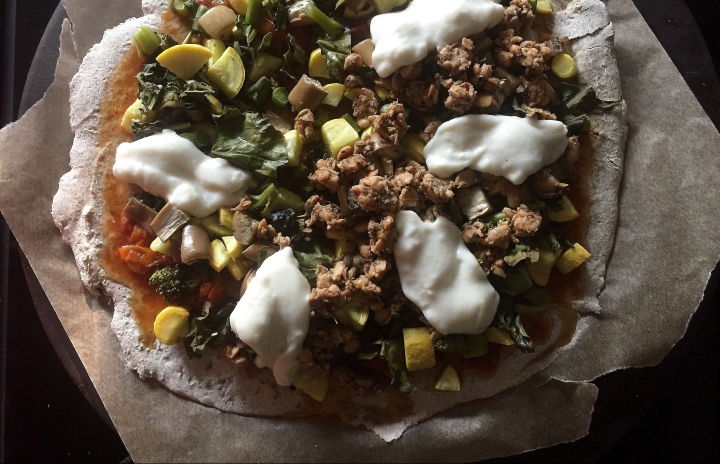
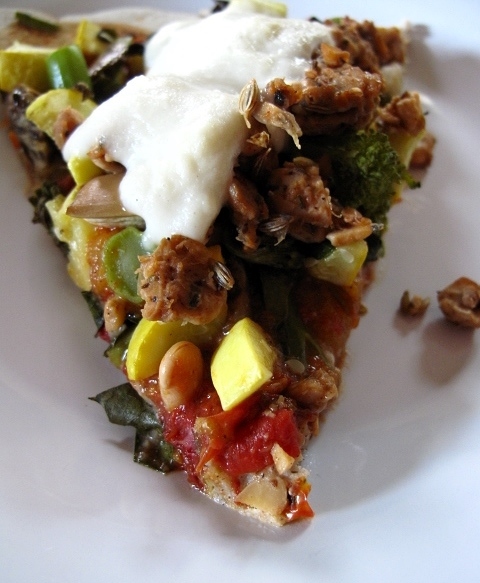
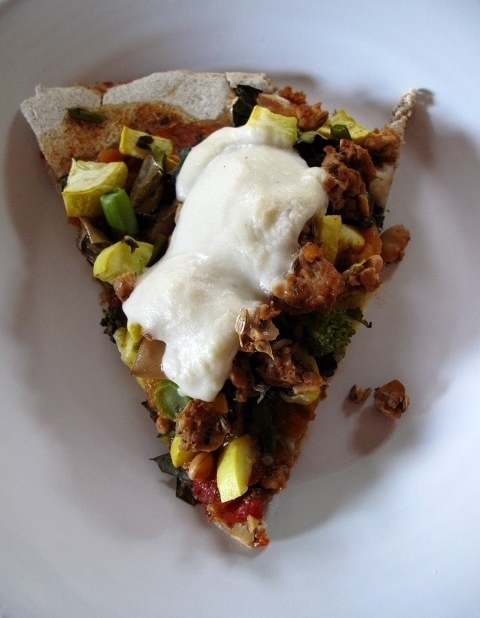
Prior to a few years ago, pizza was my long-time favorite food, and still is William’s, and this crust satisfies his discerning pizza palate enough that it actually qualifies as pizza, whereas most gluten and dairy free versions do not. Our favorite way to top this lately, in addition to the roasted vegetables and our house red sauce, is to slide a fried egg on top, but I deviated here and listed my topping ideas and recipes below.

IMG_2763

IMG_2761

Sourdough Pizza Crust {gf + vegan}, makes 1 medium pizza, enough for about 3 people
This is adapted from King Arthur Flour’s sourdough recipe, which uses wheat flour. If you’re not gluten-free, the recipe should still work in the same quantities by swapping out the flour types. 

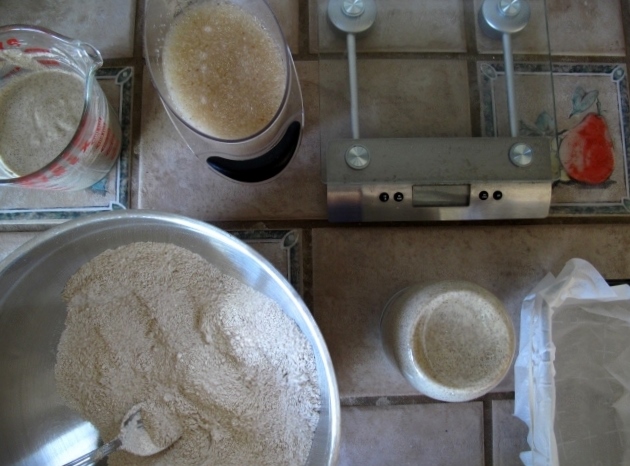
120g sourdough starter (50:50 buckwheat flour:water)
100 g hot tap water
150 g all-purpose gluten free flour
½ teaspoon sea salt
¼ tsp. yeast

  • If any liquid has collected on top of your refrigerated starter, stir it back in. Spoon 120 grams starter into a mixing bowl. Note: Then feed the remainder of your starter.
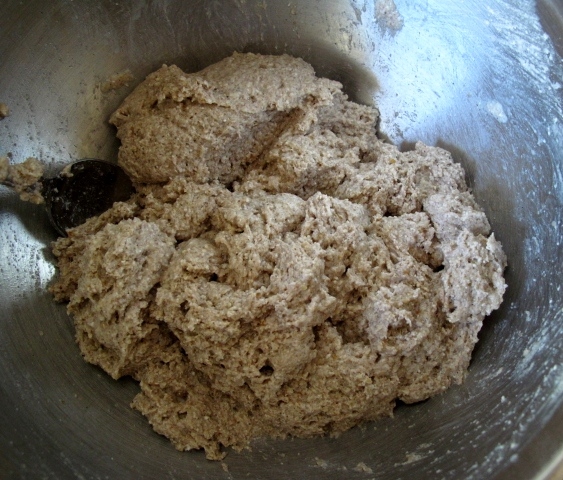
  • Add the hot water, flour, salt, and yeast. Mix to combine. It will at first be fairly wet. Cover the bowl and allow to rise until it’s just about doubled in size. This will take about 2 to 4 hours. The time it takes to rise depends on when you last fed the starter; a starter that’s been fed rather recently will react to the addition of flour and water more quickly than one that’s been neglected for a while. For a faster rise, place the dough somewhere warm (or increase the yeast). To slow it down, put it somewhere cool.
  • When the dough is risen, but still fairly wet, pour it out onto a pizza stone or pan and shape it into a flattened disk. Sprinkle the dough with a small amount of flour and then with a rolling pin that also has been lightly floured, gently roll the dough towards the edge of the pan; when it starts to shrink back, let it rest again, for about 15 minutes. Finish pressing the dough to the edges of the pan. Cover the pan, and let the dough rise until it’s as thick as you like, or, if you’re impatient, beginning topping as it is.
  • Towards the end of the rising time, preheat your oven to 450°F.
  • Turn the edges of the dough over to give it a traditional crust, or if you forget as I did above, it will still turn out just great.
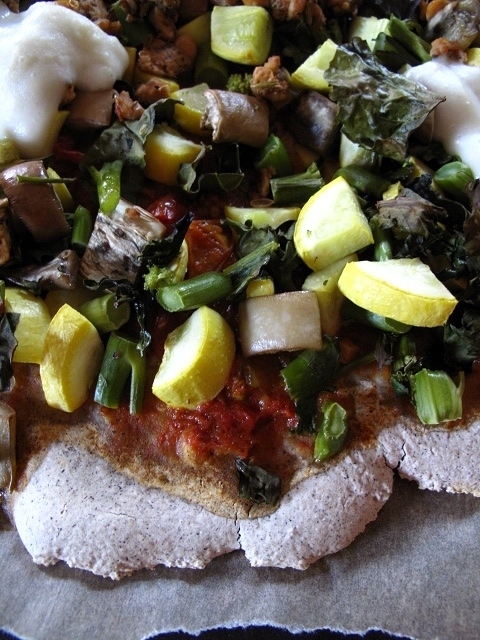
  • Top with your preferred sauce and toppings, and bake for 15-16 minutes, or until the toppings are as done as you like, and the bottom is cooked through.

My current favorite toppings:
Our house pizza/tomato sauce
Sophie’s Cashew Mozzarella
Tempeh Sausage
Seasonal Roasted Vegetables
A fried egg for each serving

Whole Grain Gluten-Free Sourdough Bread

IMG_2671

This summer, myself and a group of fellow nutrition students and alums are reading Deep Nutrition for a book club we’ve started. The theme of the book is about the benefits of traditional diets, somewhat in the Weston Price tradition, for optimal health. I cannot yet comment on what I think of the book as I haven’t read enough to have a strong opinion, but the idea of eating more in the traditional style with its emphasis on whole foods as close to the source and as untouched as possible from chemicals and the like has been a major theme in my nutritional courses over the past two years. It is also a viewpoint I adopted years ago when figuring out how to truly recover from the diet culture I was immersed in and which was contributing to my eating disorder behaviors around foods. In my classes, we’ve also delved a lot into the need for promoting gut health, since a healthy, happily functioning gut can be thought of as the foundation to health in the body and mind far beyond our digestive region. This also happens to be a topic that is near and dear to me because it’s one of my main health struggles.

As I’ve mentioned before, The three major nutritional practices that promote gut health are eating more fiber, eating more fermented foods, and reducing sugar and refined carbohydrate intake.

IMG_2660

Last summer, after a particularly rocky winter and an autoimmune lab marker coming back positive, I began a very focused fine-tuning of my diet and lifestyle, in relation to improving gut health and my reaction to stress, since both strongly contribute to autoimmune conditions. As part of that process, I began a return to making sourdough.

Sourdough, as the name suggests, is a traditional fermentation process where wild yeasts ferment the flours, making them easier to digest because the yeasts create lactic acid, and which then break down anti-nutrients that plants make to protect themselves, such as phytates and lectins. These anti-nutrients block mineral absorption and the resulting sourdough can contain a lot more readily absorbable nutrients than the original unfermented flours or grains. Additionally, the process of fermentation more generally makes all the proteins in the bread easier to digest, and it is the protein that is usually causing an inflammatory reaction for those with GI issues like intestinal permeability, malabsorption, celiac disease, and other autoimmune conditions. Due to our hectic lifestyles and often very non-whole-foods diets, many, many of us have at least some of these symptoms and/or diagnoses that could be improved by adding more fermented foods, in addition to the other two gut health promoting practices of eating more fiber and reducing sugar and refined carbohydrates.

IMG_2648IMG_2651

For someone that is very sensitive to gluten like me, there’s also good news from eating gluten-free sourdough, as there are research indications that the fermentation process involved in making traditionally fermented gluten-free bread reduces the release of inflammatory compounds within the gut for someone who has recently adopted a gluten-free diet due to a celiac diagnosis, whereas consuming other types of gluten-free bread did not reduce these inflammatory responses1.

IMG_2655

Maybe it’s the tea-drinking, sweater-garbed, sourdough-baking wise grandmother in me, but I can’t help but think, of course, to that news. It simply seems that our systems recognize and respond better to the more traditionally made foods like sourdough. Whenever I have a GI flare-up these days, I definitely try to put extra focus on avoiding those refined gluten-free products and even whole grains that weren’t cooked really well, and emphasize sourdough for my grain consumption. I’m finding this helps me return to balance more quickly. For someone that doesn’t react so strongly to gluten, consuming sourdough instead of regularly-baked bread still contributes all the positive benefits I mentioned above about keeping the gut happy and increasing nutrient absorption.

So now, after more than a year of refining my gluten-free sourdough method, I have a recipe I feel good about sharing!

IMG_2673

Whole Grain Gluten Free Sourdough Bread, makes 1 sandwich/toast loaf
– Adapted from Baking MagiqueWholehearted Eats, and with tips from Bad Hunter Stories.
– I have a 100% buckwheat starter that I began using this formula. I did not add any outside culture, but simply created it from the wild yeasts in my home. This meant it took a little longer for the starter to get good and active initially.
– For the buckwheat and oats, I often start with whole grains which I grind in my coffee/spice grinder each time I bake and feed the starter.
– I only make this using a kitchen scale rather than measuring cups, and I’ve found I can interchange the flours, by weight, using this method.
– Using slightly different flours along with the the outside weather will result in needing to change the amount of water. Err on the side of having a fairly moist dough that still comes together. 

80 g brown rice flour
140 g cold buckwheat sourdough starter
110 g water
————–
350 g water at room temperature + more as necessary to reach the desired consistency
20 g psyllium husk
10 g ground flax seeds
————–
60 g of each
– sorghum flour
– oat flour
– buckwheat flour
– millet flour
– teff flour
24 g / 2 Tbs. sugar or honey
1 tsp. sea salt

  • In the evening: Mix brown rice flour, sourdough starter and water in a bowl and cover with a clean kitchen towel. Let sit overnight (about 8-12 hours) in a warm and non-drafty place.
  • In the morning: Mix water, psyllium husk and ground flaxseeds in a bowl and whisk until a thick gel forms. Set aside.
  • In a separate bowl mix all of the dry ingredients.
  • Add the sourdough starter that you made the night before to the wet ingredients and mix.
  • Add the wet mixture to the dry ingredients and stir with a wooden spoon until the flour is fully incorporated. Add a small amount of filtered water, if needed, to arrive at a moist ball of dough.
  • Line a loaf pan with parchment and dump the dough into the pan, smoothing it out into a loaf shape and leveling it into all the corners. Cover with the clean kitchen towel or plastic bag and put in a warm place away from drafts. Allow to rise for 4-6 hours. This will depend on your kitchen warmth. Mine tends to stay cool so I err on the side of 6 to even 6 1/2 hours usually.
  • Preheat the oven to 500°F/260°C. Once the oven’s hot, remove the towel or bag from the loaf, and score the top with one or two good slashes with a sharp knife.
  • Put the loaf in the oven and turn the temperature down to 450°F/230°C. Bake for 70 minutes or until the internal temperature reaches a little over 200°F/90°C.
  • Let the loaf cool on a wire rack for at least an hour, before slicing.

1. Calasso, M., Vincentini, O., Valitutti, F., Felli, C., Gobbetti, M., and Di Cagno, R. (2012). The sourdough fermentation may enhance the recovery from intestinal inflammation of coeliac patients at the early stage of the gluten-free diet. European Journal of Nutrition,51(4). 507-12. doi: 10.1007/s00394-012-0303-y.

Gluten Free + Vegan Irish Soda Bread

IMG_4275

For a few weeks in the late winter or early spring, I inevitably begin cooking more simply, or more simply than I usually do, and turn my meat and potatoes-snubbing nose towards the flavors of home, or of home in the old country. It’s been nearly nine years now since I lived in Ireland, a place that some deep ancestral vein in me recognized as home from the first moment I stepped out for an exceptionally early morning run there, in the late summer of 2008. I rarely talk so much about my time in Ireland any longer, but on rare days I find myself especially longing for that feeling I recognized there immediately, that of truly having an origin and belonging to a place in a way that goes beyond this lifetime.

Rather than dwell on the past, I instead tend to celebrate the memories I have. And just when I especially long for spring, it comes, and I invite it in all the more because the earliest spring vegetables here are the exact same as from the Irish countryside and farms, what with nettles, watercress, overwintered cabbage, sprouting kale, parsnips, potatoes, and the like. And then of course, I bake brown bread.

I read recently that Myrtle Allen of the esteemed Ballymaloe House in County Cork once said, I was many years married before I first triumphantly put a really good brown soda loaf on the tea table. I smiled when I read it because Myrtle’s Brown Soda Bread recipe was the one I baked on repeat before making major dietary changes. And it just so happens that six years after I first began experimenting with a gluten and dairy-free version, and incidentally nearly six years married, I baked a really, really good loaf.

IMG_1482


Gluten-Free + Vegan Brown Soda Bread
Recipe Updated: 3/18/22
Brown bread is dense, craggy, and in the traditional recipes, contains no more than wholemeal flour, salt, baking soda, and buttermilk. It’s the best bread for afternoon tea, with thick vegetable-heavy chowders, or simply to provide some extra nourishment to your Irish-themed march meal(s). When I lived in Ireland, it’s the item I’d always order when out for a midday meal, along with whatever pureed vegetable soup was on for the day. If you choose to make this, know that I’ve begun baking almost exclusively by weight these days, which makes the flours a little more interchangeable, if you’ve a kitchen scale. Amaranth and/or teff provide a good dose of nutrition and hearty flavor while the sorghum and brown rice flours lighten it up a little. You can also interchange the sorghum for millet flour or likely oats, milled into a flour. Substitute flours by weight, if you choose to, instead of volume measurements.

1 cup amaranth or teff flour (120 g)
1 1/2 cups sorghum flour (180 g)
2/3 cup brown rice flour (110 g)
3/4 tsp. baking powder
3/4 tsp. baking soda
16 g psyllium seed husks 
1 Tbs. ground flax seed + 3 Tbs. warm water
1 1/2 – 1 3/4 cups (350 – 415 ml) plain non-dairy milk
2 Tbs. apple cider vinegar

  • Preheat the oven to 450 degrees F and prepare a baking pan with a piece of parchment paper on top; set aside.
  • Combine the ground flax with water to form a slurry, and then measure out the milk and add a splash of cider vinegar in a separate dish and allow it to thicken a little. Set aside.
  • In a bowl, combine the dry ingredients.
  • Pour the flax slurry and milk into the bowl with the flours, and then mix, stirring gently until the ingredients come together and form a ball (sticky but not too wet). Work quickly and do not overwork the dough as it will make the end result more dense.
  • Flour your hands and work the dough gently to shape it into a round, or alternatively bake in a 8 1/2 x 4-inch loaf pan. Using a sharp knife to make a cross on top of the bread. (This as you may know, lets the fairies out). Transfer the round to the baking pan and bake for 15 minutes. Reduce the heat to 400 degrees F and bake for 20 minutes, or until the top of the bread is golden in color and a thermometer comes out at 190-200 degrees F. If at this point it is still not quite done , turn down to 350 degrees and bake for 10-15 minutes longer. Depending on the humidity of the day and room, and the shape you choose for your loaf, baking time will vary.
  • Let cool on a rack. Like all true soda breads, this bread is dense, and it’s best eaten within a day or so.